Introduction
You know the moment. A production bug points to one service, the logs point to another, and the real answer is hiding in a helper function nobody has touched in eight months. You do not need another generic chatbot tab. You need a developer AI assistant that can read your repo, inspect your conventions, run safe commands, and answer questions in the place where you already work.
The good news is that this has become much less exotic. You no longer have to build the full stack yourself. Today, you can assemble a practical assistant from standard tools: an editor client like Continue, an LLM from OpenAI, Anthropic, or a local Ollama model, fast code search with ripgrep, and tool access through the Model Context Protocol, or MCP.
This guide shows you how to build a personal AI assistant for developers using current, boring, available pieces. You will wire up repo context, expose a few safe tools, connect it to your editor, and avoid the traps that turn assistants into expensive autocomplete.
The Friction Is Not Chat, It Is Context
Most failed AI assistant experiments have the same shape. You paste an error into a chat window, get a confident answer, then spend ten minutes explaining your folder structure, framework version, test setup, naming conventions, and why the suggested import path does not exist.
That is not a model problem first. It is a context problem.
A useful codebase AI assistant needs three kinds of context:
- Static context, such as source files, docs, architecture notes, and configuration.
- Live context, such as the current file, selected code, terminal output, and failing test logs.
- Operational context, such as commands it is allowed to run and files it is allowed to inspect.
Modern tools are finally aligning around that shape. Continue provides an open-source IDE assistant that can connect to multiple model providers and local context sources, according to its documentation Continue docs. MCP defines a common way for AI applications to connect to tools and data sources MCP introduction. ripgrep gives you fast recursive code search from the command line ripgrep repository.
That combination is enough for a genuinely useful personal assistant.
The important shift is this: do not start by building a chat UI. Start by giving your assistant high-quality repo access and a small set of safe actions.
The Practical Architecture
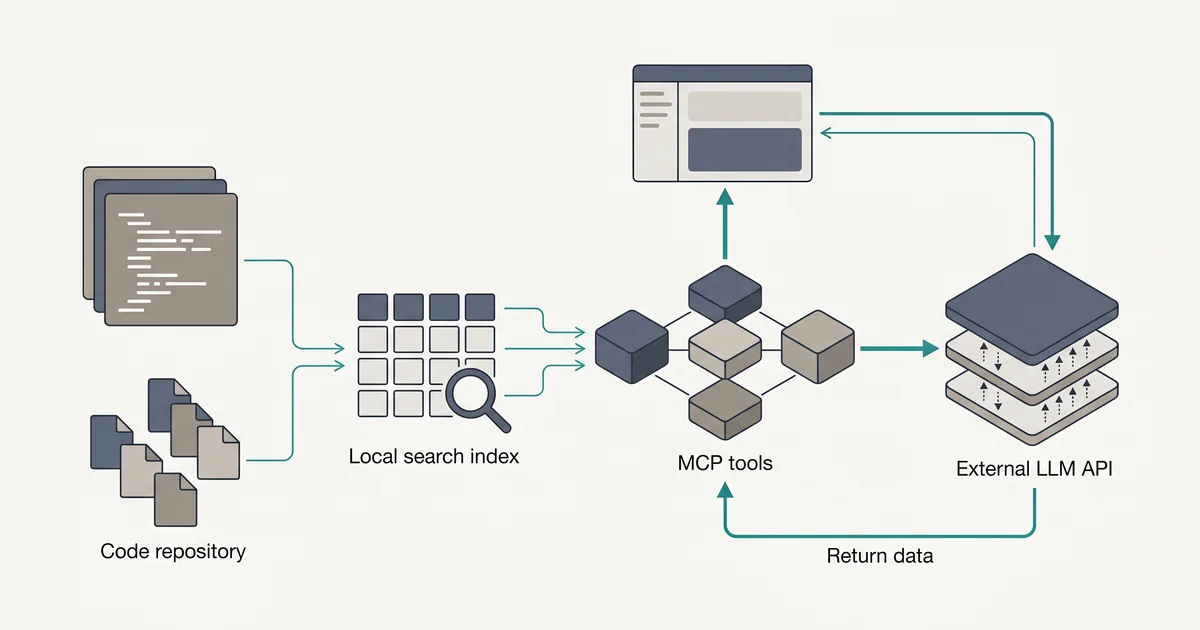
Think of your assistant as four replaceable layers.
The model layer is the LLM you use for reasoning. You can use hosted models through OpenAI or Anthropic APIs, or run local models through Ollama. OpenAI documents its API for text generation and tool-style workflows in its platform docs OpenAI API docs. Anthropic documents tool use and the Messages API in its developer docs Anthropic Messages API. Ollama provides a local runtime for running supported open models on your machine Ollama docs.
The interface layer is where you talk to the assistant. Continue is a strong default because it works inside VS Code and JetBrains IDEs and is designed around code context Continue docs. You can also expose the same backend through a CLI later.
The context layer decides what information reaches the model. This can be as simple as current file plus ripgrep output, or as advanced as embeddings with LanceDB, Chroma, or a hosted search service. Chroma describes itself as an open-source embedding database in its docs Chroma docs. LanceDB documents local and server deployment modes for vector search LanceDB docs.
The tool layer lets the assistant do controlled work. This is where MCP is useful. Instead of hard-coding every integration into your editor, you expose tools like search_code, read_file, and run_tests, then let your AI client call them through a standard protocol.
For a personal assistant, keep the first version intentionally small:
- Search code with
rg - Read allowed files
- Inspect git diff
- Run tests with an explicit path
- Summarize project conventions from docs
That is enough to answer questions like:
- “Where is user authorization enforced?”
- “Why does this test fail?”
- “Generate a migration plan for this function rename.”
- “Write a PR description from my staged diff.”
- “Find similar handlers before I add a new endpoint.”
Those are practical, daily tasks. They are also narrow enough to keep the assistant reliable.
Build It with Standard Tools
The fastest path is to use Continue as the editor client and a small MCP server as your local tool bridge. You will avoid building a UI, avoid inventing a tool protocol, and keep sensitive repo access on your machine.
Step 1: Pick Your Model
Use a hosted model if you want the least setup and best reasoning quality. Use a local model if privacy, offline work, or predictable cost matters more.
A practical setup looks like this:
- Hosted default: Claude Sonnet or GPT-class model for planning, debugging, and refactoring.
- Local default: Ollama with a code-capable model for quick repo questions.
- Fallback: smaller local model for simple summarization.
If you use Ollama, install it and pull a model:
ollama pull qwen2.5-coder
ollama serve
Then test it:
curl http://localhost:11434/api/generate \
  -d '{
    "model": "qwen2.5-coder",
    "prompt": "Explain what a repository pattern is in Python.",
    "stream": false
  }'
Ollama exposes an HTTP API for local model interaction, as documented in its API reference Ollama API docs.
Step 2: Install Continue in Your IDE
Install Continue in VS Code or a JetBrains IDE, then configure your model provider. Continue supports configuring models and context providers through its configuration system Continue configuration docs.
A minimal local model configuration will vary as Continue evolves, but the idea is simple: point Continue at your provider, choose a model, and enable repo context.
Example shape:
{
  "models": [
    {
      "title": "Local Coder",
      "provider": "ollama",
      "model": "qwen2.5-coder"
    }
  ],
  "contextProviders": [
    {
      "name": "code"
    },
    {
      "name": "diff"
    },
    {
      "name": "terminal"
    }
  ]
}
Do not over-configure this yet. First, confirm you can ask about the current file, selected code, and git diff from inside your editor.
Try prompts like:
Explain the selected function. Point out hidden side effects and missing tests.Using the current diff, draft a PR description with risk areas and test notes.If the assistant cannot use your visible editor context well, adding a vector database will not fix it.
Step 3: Add Fast Local Code Search
Before you reach for embeddings, add ripgrep. It is simple, fast, and extremely useful for code questions.
Create a small Python helper:
# tools/search.py
from __future__ import annotations

import subprocess
from pathlib import Path

ROOT = Path.cwd()
ALLOWED_EXTENSIONS = {".py", ".ts", ".tsx", ".js", ".go", ".rs", ".md", ".yaml", ".yml", ".json"}

def search_code(pattern: str, max_lines: int = 80) -> str:
    result = subprocess.run(
        ["rg", "--line-number", "--smart-case", pattern, str(ROOT)],
        capture_output=True,
        text=True,
        timeout=10,
    )

    lines = result.stdout.splitlines()
    return "\n".join(lines[:max_lines])

def read_file(path: str, max_chars: int = 12000) -> str:
    target = (ROOT / path).resolve()

    if not str(target).startswith(str(ROOT.resolve())):
        raise ValueError("Path is outside the project root")

    if target.suffix not in ALLOWED_EXTENSIONS:
        raise ValueError(f"File type not allowed: {target.suffix}")

    return target.read_text(errors="replace")[:max_chars]
This is not glamorous, but it solves a real problem. The assistant can find call sites, read nearby files, and avoid making up names.
The path check matters. If you expose file reads to an AI tool, make the project root explicit and reject paths outside it.
Step 4: Expose Tools Through MCP
Now wrap those helpers in an MCP server. MCP uses a client-server model where applications can connect to servers that expose tools, prompts, and resources MCP architecture docs.
Install the Python SDK:
python -m venv .venv
source .venv/bin/activate
pip install mcp
Create assistant_server.py:
# assistant_server.py
from __future__ import annotations

import subprocess
from pathlib import Path

from mcp.server.fastmcp import FastMCP

mcp = FastMCP("repo-assistant")

ROOT = Path.cwd().resolve()
ALLOWED_TEST_PREFIXES = ("tests/", "src/")

def safe_path(path: str) -> Path:
    target = (ROOT / path).resolve()
    if not str(target).startswith(str(ROOT)):
        raise ValueError("Path is outside the repository")
    return target

@mcp.tool()
def search_code(pattern: str) -> str:
    """Search the repository with ripgrep and return matching lines."""
    result = subprocess.run(
        ["rg", "--line-number", "--smart-case", pattern, str(ROOT)],
        capture_output=True,
        text=True,
        timeout=10,
    )
    return "\n".join(result.stdout.splitlines()[:100])

@mcp.tool()
def read_repo_file(path: str) -> str:
    """Read a text file from the repository."""
    target = safe_path(path)

    if target.suffix not in {".py", ".ts", ".tsx", ".js", ".md", ".json", ".yaml", ".yml"}:
        raise ValueError("Unsupported file type")

    return target.read_text(errors="replace")[:16000]

@mcp.tool()
def git_diff(staged: bool = True) -> str:
    """Return the current git diff."""
    command = ["git", "diff", "--cached"] if staged else ["git", "diff"]
    result = subprocess.run(
        command,
        cwd=ROOT,
        capture_output=True,
        text=True,
        timeout=10,
    )
    return result.stdout[:20000]

@mcp.tool()
def run_pytest(path: str) -> str:
    """Run pytest for an explicit test path."""
    if not path.startswith(ALLOWED_TEST_PREFIXES):
        raise ValueError("Tests must target tests/ or src/")

    target = safe_path(path)
    result = subprocess.run(
        ["pytest", str(target), "-q"],
        cwd=ROOT,
        capture_output=True,
        text=True,
        timeout=60,
    )

    return (result.stdout + "\n" + result.stderr)[-20000:]

if __name__ == "__main__":
    mcp.run()
This gives your assistant four useful capabilities without giving it your whole machine.
The key design choice is that tools are narrow. The assistant cannot run arbitrary shell commands. It can search, read, inspect diff, and run tests. That is the difference between useful automation and a local security incident.
Step 5: Connect the MCP Server to Your Client
MCP clients use configuration to launch or connect to MCP servers. The exact file location depends on your client, so use your client’s MCP documentation. The server command usually looks like this:
{
  "mcpServers": {
    "repo-assistant": {
      "command": "python",
      "args": ["assistant_server.py"]
    }
  }
}
Once connected, ask your assistant a tool-friendly question:
Find where billing permissions are checked. Read the most relevant files and summarize the authorization flow.A good answer should cite specific files and functions from your repo. If it gives vague architecture advice, your context path is broken.
Then try a debugging prompt:
The test tests/billing/test_invoice_permissions.py is failing. Inspect the related code, run the test, and suggest the smallest safe fix.You should expect the assistant to call read_repo_file, search_code, and run_pytest. You should not let it edit files automatically in version one.
Step 6: Add a Project Instruction File
Your assistant needs your team’s taste. Put that taste in a file instead of repeating it in every prompt.
Create .ai/project.md:
# Project instructions

You are helping with the Acme Billing API.

Stack:

- Python 3.12
- FastAPI
- SQLAlchemy 2.x
- PostgreSQL
- pytest

Conventions:

- Use type hints for public functions.
- Keep API handlers thin.
- Put database access in repository classes.
- Do not use raw SQL outside migrations.
- Prefer explicit authorization checks in service methods.
- Add or update tests for behavior changes.

When answering:

- Name the files you inspected.
- Separate facts from guesses.
- Suggest the smallest safe change first.
- If you need a command, ask before using anything outside available tools.
Reference this file in your editor assistant configuration if supported, or paste it into your assistant’s custom instructions. Continue supports customization around rules and context in its docs Continue customization docs.
This small file often gives you more value than a larger model. You are encoding local conventions the model cannot infer from public training data.
Where Developer Assistants Usually Go Wrong
The first common mistake is adding too much context. More context feels safer, but it can dilute the exact signal you need. Start with current file, selected code, search results, and specific docs. Add embeddings only when search is not enough.
The second mistake is giving the assistant unrestricted tools. Never expose a generic run_command(command: str) function in your first version. If you need command execution, create specific tools like run_pytest, npm_test, or go_test, each with path checks, timeouts, and output limits.
The third mistake is skipping output limits. Test logs, generated files, and diffs can explode quickly. Cap returned characters from every tool so one noisy command does not consume the model’s useful context.
The fourth mistake is treating generated code as done work. Your assistant can draft, inspect, and suggest. You still own the diff. Keep the habit of reading every change, running tests, and checking whether the code follows your system’s design.
The fifth mistake is starting with multi-agent orchestration. You do not need a planner agent, reviewer agent, tester agent, and memory agent on day one. You need one assistant that can answer repo questions accurately. Make that boring and reliable first.
When to Add Embeddings, Memory, and Automation
Once your assistant is useful with search and MCP tools, you can upgrade it in three directions.
Add retrieval-augmented generation when your repo is too large for simple search. A practical approach is to chunk docs and source files, embed them, and retrieve relevant chunks per question. Chroma and LanceDB are common local options with documented Python workflows Chroma docs LanceDB docs.
Add memory when you keep repeating project decisions. Do not store entire conversations forever. Store concise notes like “we use service-level authorization for billing actions” or “legacy invoices live under src/billing/legacy until migration is complete.” Keep memory editable so bad assumptions do not become permanent.
Add write actions only after read actions are trusted. A safe next step is a tool that writes patches to a temporary file, not directly to your working tree. You can review the patch with git apply --check before applying it.
For example:
@mcp.tool()
def propose_patch(filename: str, patch: str) -> str:
    """Write a proposed patch to .ai/patches for human review."""
    patches_dir = ROOT / ".ai" / "patches"
    patches_dir.mkdir(parents=True, exist_ok=True)

    safe_name = filename.replace("/", "_").replace("..", "")
    target = patches_dir / f"{safe_name}.patch"
    target.write_text(patch)

    return f"Patch written to {target.relative_to(ROOT)}. Review before applying."
This keeps the assistant in the loop without letting it silently mutate your repo.
If you want team-wide usage, move slowly. Shared assistants need shared rules, access control, secret handling, and logging. A personal assistant can be scrappy. A team assistant becomes infrastructure.
The Takeaway
A useful personal AI assistant is not a magic personality in your editor. It is a practical system: a model, your project context, a few safe tools, and clear instructions.
Start with Continue or your preferred AI editor, connect a model you trust, add MCP tools for code search and test runs, and write down your project conventions. Keep the first version read-heavy and boring. If it can reliably answer “where is this behavior implemented?” and “why is this test failing?” it is already saving you real time.
The best personal AI assistant is not the one with the flashiest demo. It is the one that understands your repo well enough to reduce the 11 PM debugging fog, while still leaving you in control of the code you ship.